Can I help you find something??

Showing posts with label Nursery. Show all posts

10 July 2014

Your baby at 2, half her adult height

Have you heard the little trick that if you measure your child's height when they turn two, that this will be half their adult height??

It seems like there is a fair amount of accuracy to it, (give or take a few inches) and so I was super excited to measure Madeleine when she had her 2nd Birthday last month. 

We did it when my niece was 2, which was almost three years ago already, and she was exactly half of my height, approximating her to be 5'10 when she's an adult. It seems like she's on track for this too, Lahna is a complete string bean!!! 

I was so excited to see what height Maddie would be, and so I made her a growth chart ready for her 2nd Birthday.

Knowing that we're going to moving around a bit throughout our childrens' lives, we can't rely on the one trusty doorframe to mark out their growing heights.

So I made a fabric height chart that could travel around with us and mark out our little family as it grows.

So as soon as the hustle and bustle of her Bunny Party calmed down, we got to measuring our little girl....

28 March 2014

Baby to Little Lady room update: Curtain makeover

If you've been following along, I have been posting about the updates we've been making to Madeleine's room. As I have been updating her nursery to a room fit for a little lady I replaced the nursing chair with a slimline rocker, and I've been hanging her beautiful baby clothes as wall art

Another change I made a few weeks back was an update to her curtains. I made the original green curtains and so didn't want to just discard them. They are nice and heavy and so keep Madeleine's room dark and warm on these cold London mornings. 


And so I bought some super cheap (as in £7 cheap) lightweight white curtains to hang over the top of the original ones. But when they arrived, I discovered I had mis-measured. Oops. So I turned it to my advantage and made neutral colour-blocked curtains. 


The beige fabric piece on the bottom of the curtains gave it a little extra weight so that they hung nicely, and I really like the slight colour variation. 

And then of course they needed a little glam and gold, so I made a sweet little Sparkle Bow Curtain Tie to finish them off beautifully. I don't need to wax lyrical about my love of gold, and sparkles and bows... we've met! 


I really love the finished product. It makes her room much lighter and brighter, but yet is still classic and feminine. I like that I can use the full set of curtains at night time and for naps, and then have the lighter ones to flow in the afternoon breezes!


Happy Friday! What do you have planned for the weekend? We are going to be heading out for lunch tomorrow and I've no idea what Madeleine has planned for Mother's Day on Sunday, but she needs to remind her Daddy, he seems to have forgotten all about it!!! I hope you have a wonderful weekend!! 

post signature


Psst!! If you are looking for a little more meg-made, I'd LOVE for you to follow along!


please-follow-me-on-pinterest please-follow-me-on-facebook please-follow-me-on-bloglovin please-follow-me-on-instagram

19 March 2014

Baby to Little Lady Nursery Update: Nursing to Rocking chair

Last week I did a post on the updates that we've made to Madeleine's room, as our little baby becomes a little lady. These changes have been subtle but effective, and it has become my favourite room in the house again!

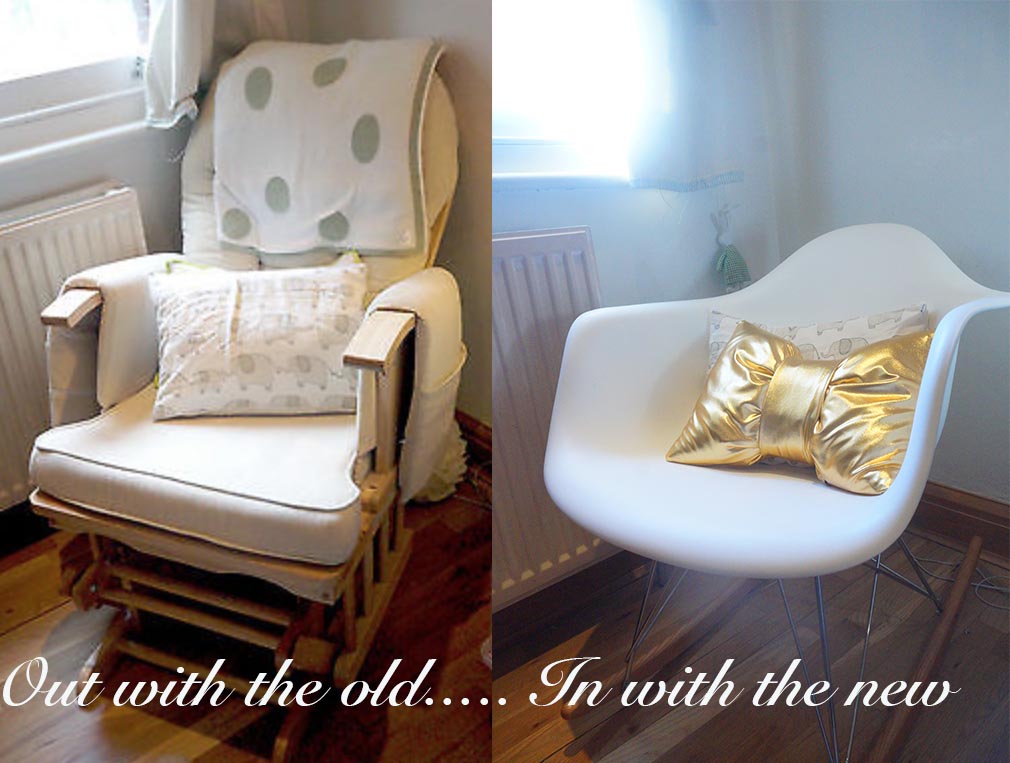
The one big item that I wanted to change was the nursing chair. I loved my rocker/glider throughout my final trimester when I could no longer sleep in our bed, and loved all the hours I nursed my baby in it. But, gone are those hours spent cuddling in a chair, replaced by segments of time playing and reading and singing instead.

I did some research into chairs and have always loved our neighbours chair, and was beyond thrilled to find the Eames RAR replica chairs were about an 8th of the price! Yay! So farewell old chunky nursing chair and hello slimline rocking chair! 

meg-made: Baby to Little Lady Nursing/Rocking chair

The new chair takes up about half the space of the old one, and I kept our footstool so it is still just as comfortable to sit and do some rocking and reading together. Our little girl loves to read so its nice to still have a special little place to sit and read together.

meg-made: Baby to Little Lady Nursing/Rocking chair Eames RAR

Plus this one is light enough for Maddie to be able to rock herself in now, which amuses her greatly!

meg-made: Baby to Little Lady Nursing/Rocking chair Eames RAR

meg-made: Baby to Little Lady Nursing/Rocking chair Eames RAR

meg-made: Baby to Little Lady Nursing/Rocking chair Eames RAR

You may detect a little bit of a theme (gotta love a theme) and so loosely it is just soft neutral tones with touches of pink and gold. Maddie knows how to say "pretty" now, and I'll give her two different options and she'll always pick the pink or gold one and say "pretttttttty". So really, I can't deny my daughter her wishes can I...? hehe.

I made this gold bow cushion to add to her little elephants cushion, and love the little bit of glam it adds to her room! 

meg-made: Baby to Little Lady Nursing/Rocking chair Eames RAR

I have finished off the changes to her curtains, which has also made a huge difference to the brightness of the room, but this post is getting lengthy enough, so that will be another post next week!

Maddie and I are off to Jersey today, so if you're wondering why I am posting photos of the beach and cows, now you know!!! I hope you are having a lovely week!!

post signature

Psst!! If you are looking for a little more meg-made, I'd LOVE for you to follow along!


please-follow-me-on-pinterest please-follow-me-on-facebook please-follow-me-on-bloglovin please-follow-me-on-instagram

12 March 2014

Baby to Little Lady Nursery Update: Wall Art

Decorating Madeleine's nursery was such a joyful time for me. "Nesting" was one of my favourite things about being pregnant, and I spent hours and hours making special little things for the arrival of our little girl. We had just moved to London from our student year in Oxford and was was pretty unwell throughout my pregnancy, so what I lacked in disposable income, I made up for in time at home. And so I sewed and crafted to my hearts content, and created the perfect space for our baby to come home to. 

And then that baby turned into a little lady, and I found myself wanting to change things up. 


Long gone are the cot mobile, cot bumper and receiving blankets, and bit by bit I am turning Madeleine's nursery into a space for a little lady.


Ever since Maddie was born I've been hanging clothes and shoes around her room as pieces of art.

Partly because I didn't have any real wall art yet, but mostly because it was all so cute I didn't want it to sit in a cupboard for nobody to see! I am going to box frame some of my favourite shoes of hers one day (if we don't have another girl first though) but in the mean time I thought I would change the display to being some favourite pieces from the past year. 


The little cardigan is what Madeleine's Great-Nanna hand knitted her; 
The ivory Marie Chantal dress is what she wore for her Christening, 
And then I had to include her most recent party dress from Christmas! 

Every day when Maddie and I go into her room to get her dressed I ask her what she wants to wear and she points at the pink and gold dress and says "pretty dress". Oh dear!

And because my obsession with gold glitter still hasn't come to an end (and potentially, there's just a small chance that I am passing this obsession on), I decided to make her hangers a little prettier too!


I dream about the time when our house is big enough to fit a teepee and drawing table in Maddie's room, but until then, I am having fun creating a more grown-up space she can play in, without spending a fortune! The next step, removing the Nursing Chair!!

post signature

Psst!! If you are looking for a little more meg-made, I'd LOVE for you to follow along!


please-follow-me-on-pinterest please-follow-me-on-facebook please-follow-me-on-bloglovin please-follow-me-on-instagram

25 April 2012

Book hanger

I am pretty proud of this one! It actually worked out exactly how I was hoping, and having just created it as I went along, I actually wouldn't have changed anything! It was far easier than I had anticipated, even with the pockets having pleats and all!

Here is the book hanger that I've made for the nursery. For my little Niece and Nephew, we are "those" Aunts and Uncles who always give a book as one of their many gifts for birthdays and Christmases. So, naturally, about to become parents ourselves, we have a huge desire for our little one to be surrounded by books. I wanted to make this hanger so that books will always be on hand in her room, so that even when she but a few hours old, we can read to her.


I found this fabric and fell in love! It was everything I wanted for our nursery! I am sort of glad I didn't find it until I was half way through the decorating process though, as otherwise, I'm afraid the walls would have been covered in it!!!


Here is a photo of how the pockets sit without any books in them. It is made from one long piece of fabric, pleated at both sides, and a large pleat sewn in the middle. I knew she would have quite the library, so flat pockets just wouldn't do!


And what would we find wandering amongst the pretty trees and grass, why an elephant, zebra and horse of course!!! I love these Incomparable Buttons so much!!!


11 April 2012

Nappy Stacker

I've been wanting to make a nappy stacker since well before falling pregnant, but for some reason, became quite timid to ever get started on it.

There's a few online tutorials which I read through, but couldn't find any to be exactly what I was after, or that seemed simple enough for me to follow sans-pattern. I made mine quite large so that it will fit big girl nappies in two years as well as the teeny tiny adorable newborn ones for very soon. I wanted to keep the colours fairly neutral soon so that perhaps one day all that may need changing is making blue ties in place of the pink ribbons.

Although it took me a while to get started, it actually wasn't difficult to make, and I am really pleased with how it turned out.


I found a sturdy piece of cardboard from a packing box and used this as the base size. I then cut my four side pieces based on the cardboard dimensions, and made them all the same height. The two side panels I made into isosceles trapezoids (yep, had to wiki my quadrilaterals for that one). I wanted the sides to be expandable but didn't want to mess around with too many pleats.


I used the base board in the stacker to hold the base firm. I covered one side of the board with batting and covered it in the same fabric. It feels lovely with the padding rather than solid board.


I wanted to use ribbons at the top so that I have flexibility with how it is displayed, not limiting me forever to a coat hanger.


I am really happy with how it turned out and couldn't help myself, and have already started filling it with nappies!! It will hold almost 70 newborn diapers, soooo, that's the first week taken care of!! 


Oh golly...

19 March 2012

A call for curtains!

We have drop-down drapes hanging on all the windows in our house, which are somewhat effective in that they block rays of sun, but that's about all they do. They do not provide much warmth in winter, and certainly don't provide much darkness in the early mornings! Whilst this is fine for us, it just simply won't do for our little baby!

I made these tab-top curtains months and months ago, before we knew the babys' gender. I used really heavy quality cotton and backed them with calico. I made the pink ties on the afternoon after finding out we were having a girl, was eager to make anything pink!

The curtains at least keep some warmth in and provide a fair amount of darkness, so hopefully we'll be able to get her to understand the difference between night and day, as soon as humanly possible!!